Thursday, February 25, 2010

Benches - Design and Color (+ renovations update)

We started the day with a marathon meeting with the representative of PVPlast, the company that will make our lab furniture (benches, desks, etc.).


We went over every little detail in the plans for the first stage (molecular lab) furniture.


This kind of discussions tend to prolong, as everyone wants to make sure that there are no mistakes. Turns out that there were few mis-communications (e.g., the PVPlast people did not plan electricity outlets).


In the end we got to a summary that I believe is good set of decisions, and so we are on our way to having a simple and functional laboratory.

Then we moved to the much harder decision of color combination. After much debate, we decided to go with light gray bench tops, dark gray color for the steel elements (legs, and shelf holders), and very light cream/off-white color for the desk tops, and vertical surfaces. Here are these color choices with the sample of the floor tiles.


As usual it is very hard to visualize how this will look in the end. I hope this choice will provide a nice but not too assertive environment. We will add color by lab ware,  devices,  and possibly chairs.

Ayelet was very happy after the choice was completed.


In other renovation updates. The workers finished laying the frame for the ceiling.


They also finished closing the drywall for the electricity board (double layer of drywall with insulation in between).

Later today we had an incident where the workers used a saw to cut some thick metal pipes or frames (I am not sure what). This raised a lot of smoke and ash that quickly spread to the surrounding labs. This lead to justified irritation by all our neighbors. It also showed how easily microparticles travel between labs in this building.

Wednesday, February 24, 2010

More singer troubles (and pirates!)

Our streak of problems with the Singer RoToR continued today. While Ayelet was copying a library, it tried to copy a plate with a pin-pad. This meant that the head squashed into the plate, got dirty with cells, and contaminated everything there.

Unlike last time, we managed to disengage the head for cleaning without damaging any wires. Cleaned it and let it dry. Upon trying to using the RoToR again, it kept pretending to have lifted the pads while actually working without ones.

Since I was to start three hours of meetings with undergradutes, I managed to email Ian at Singer Instruments about the problem and told him I will try to catch him later.

After my meeting, I contacted Ian through the Singer remote help interface and in parallel through Skype. We tried to figure out why the head does not pick up pads and yet believes that the pad is there.

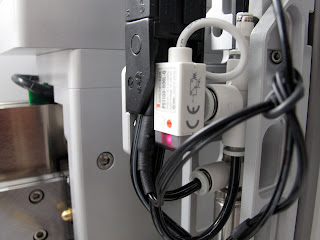
Turns out that the vacuum tube that "sucks" the pad to head runs through a pressure sensor that can monitor whether air is moving through the tube or not --- if it stops moving than its a sign that the pad is held by the pressure. You can see the sensor as the little white box with the red light in the middle of the picture.


Ian asked me to tune the sensor sensitivity. This meant turning the small orange dial above the red light. The light indicates whether there is pressure or not, and I had to turn the dial just to the point where the light turns off.

The dial was very sensitive and often it sufficed that I touched it with the (mini-)screwdriver to change its decision. Each time we tested whether the head lifts the pad, and then whether it recognize when it had a pad to lift and when not. It was very frustrating as it either recognized that a pad is there regardless, or it didn't. We didn't manage to get it to setting (that is me tweaking and Ian directing the operations remotely) where it made the right calls.

In the middle of all this, a pirate stormed into the lab


and attacked the fridge

(and who said laboratory work was dull :-) This was Matan, my ex-student and dive-buddy, who came in to collect something. Apparently, he was on his way back from costume party.

In the end, Ian decided we should try the version of the software with the older user-interface. Since this is the version we are using day to day, it was fine with me. Surprisingly, in this version the tuning worked the first time. We performed several trial runs and the machine worked flawlessly.  I am not sure if this is the end of the problems, but lets be optimistic.

Tuesday, February 23, 2010

Here come the ceilings

The renovation in the lab continues. The workers started to prepare the framework for putting in the lab ceiling. This involves metal frame and drywall construction. They also sealed all the wholes in the top part of the lab and removed much of the old pipes throughout the lab (the pipes you see in the picture below the windows are temporary bypasses).


The hole in the wall is no built from drywall and ready for the electricity contractor.


At the same time outside workers repaired the exterior of the building (nothing to do with the renovations). This involved a lot drilling and hammering, which made tons of noise. In the middle of this mayham, some of us continued to work.


(I on the other hand, spent the whole day in committee meetings and one-to-one meeting with undergraduates)

P.S. Today we had an amazing morning sky. Combined with the blooming trees all around, makes for a great view. This picture was taken in the parking lot outside our lab.

Monday, February 22, 2010

Planning a Laboratory

We had already multiple entries about the lab renovations, but I didn't get a chance to show off the current plans. So here is my excuse.

While the basic renovation is progressing (more updates soon), we are meeting on Thursday with the furniture manufacturer to go over the final details of the order. This gave Ayelet and me a reason to revisit the plans and update them in light of our recent experiences in the lab. Although this is the n'th iteration, I still feel that we are a bit amateurish in architecture/interior design, and so will be happy to get feedback (this is still not final, and so...)

The lab we will occupy consists of two large rooms that are facing each other. The layout before we started the renovation was simple two (almost) symmetric rooms with doors facing each other:


Since we are currently occupying room 2-313 (the bottom one), the renovation is going in a stepwise manner. The top one is being renovated right now. When that room will be ready, we will move our stuff there, and then the bottom one will be renovated.

The plan for the first room, is as a basically a fairly standard molecular biology lab. It contains four bays with benches, at the end of which there are desks for personal computer workstations.

where gray are workbenches, light blue are desks (lower height), and purple is a sink.

There were several issues we wanted to take care of in the design:
  • We wanted this space to be a flexible lab to allow for changes in the future.
  • We expect 6-8 people working in the lab.
  • Each bench to have an adjacent desk, so that people can move from bench work to the computer readily
  • We wanted ample space for shared equipment (PCR block, centrifuges, heat blocks and water baths, etc.).
  • Maintain a clear "walkway" along the lab length
  • The hood location was forced on us by the existing exhaust pipe and the fact that safety regulation require it to be about a meter from the door. 
  • The electricity board location was also forced on us by various regulations and constraints.
  • We wanted to leave the existing doorway intact, both to save on costs and also to have the lab doors facing each other.
We decided to have fairly deep benches (70 cm). However, with current "thin-screen" computers, we do not need deep desks. To gain more space for chairs at the end of the bays, we made the desk have little bays of their own. The actual design is going to be more rounded and nicer than the drawing above.

We also decided to have the "outer" benches longer (without desks) to allow more space for communal equipment and areas (e.g., gel running area, weighs and solutions area). If the case arises we can convert part of them into personal workspace. We also have a bench next to the sink that will be a good space for large equipment (e.g., larger centrifuge and PCR block).

We are debating what to do with the alcove on the right. We can move one of the refrigerators there and then elongate the middle shared bench area. Alternatively we can have the rightmost bench all the length of the wall, but that leaves a fairly in accessible area in the end.

In terms of storage we plan to have cabinets below the end tables, drawers (on wheels) below each bench, as well as refrigerator/freezer (each bay will have one of each). In addition, we will have shelves over the middle benches and along the walls.

The second room, is more complicated.


We are planning to divide it into three parts. The main one, in the middle, will host the robotic platform (on which I will expand in another post). This room will have a large cargo door that during normal operations will be shut. In addition, we plan to block the windows to minimize dust and to avoid direct sunlight (as the windows are facing south) and reduce temperature shifts. This room will also have tighter and stronger A/C system to maintain steady temperature for our assays.

The day to day access to the robotic room is through an intermediate small hallway on the right. This room will have space for a computer screen and printer, and maybe other small displays. This hallway also leads to a (fairly small) office.

On the left we have extra space for a meeting and kitchen. This room will serve the three research groups in our corridor and give a (sorely missing) place to have coffee or each lunch (as the labs are no-food-allowed area). We are still in early design stages regarding this room.


In addition,  half way down the corridor, we were given an other small room.  We are going to dedicate for the Singer operations. It will contain the Singer and the MasterClave station.

The idea is that since the Singer can be of use to multiple groups in the institute, and does not require intimate connection with the rest of the lab. Thus, having it in its own room will allow for simpler access and will not be a point of contention when others are using it.

Thursday, February 18, 2010

A hole in the wall

The renovations are proceeding at a fast pace. Today the workers made a whole in the wall to make space for the planned main electricity board. They already constructed the foundation for drywall that will enclose the board.

And from inside it looks more striking.


On a related note, there are rumors that the A/C contractor was selected, but I will wait for next week to hear about it.

On unrelated note, we are experiencing summer-like weather with a heat wave and haze. Yesterday we had a very colorful sunset, while today it was almost the opposite.


Tuesday, February 16, 2010

HyperCyt!

We got the HyperCyt robotic FACS loader almost six weeks ago (wow, time flies when you are busy), and after some delays we are finally starting to see it getting into working conditions. The last few weeks David and Ariel (from Merkel Technologies) came several times to install the various components and checked the software installation. They also replaced the old Mac computer that runs the FACS with a newer G5 machine.


So, why I am writing about this today? Because, today was the first "wet test" for the HyperCyt. Ariel (ours, not Merkel Tech's, this is very confusing) and Ayelet seeded two strains of yeast for overnight growth. In the morning they organized them on a 96-well plate.


We then moved to the HyperCyt. The machine consists of a shaker on which we put the plate, a robotic arm that moves a sample needle in three degrees of freedom (X-Y and up/down), and a peristatic pump.


The idea is that we can in a fast succession sample successive wells on the plate. First, however, we need to program the control procedure to define which wells to sample.


Then, we can run the program and see the needle go from one well to the next.


You can see the needle going into each well in a succession. During the interval between wells the pump sucks an air bubble, which sepereate the samples from the previous well to the next one. Moreover, at the end of the row it goes to a wash station and shakes the plate to resuspend the cells. We can program the HyperCyt for different schedule of sampling, speed of the pump,  needle washing schedule, shaking schedule, and so on.

The test was the first step to get this system working. We are still missing a clean interface for connecting the cable into the FACS and for seemless integration between the HyperCyt controller and the FACS controller. However, the first test shows that the system does work and allow us to measure on the FACS the cells from multiple wells.

Monday, February 15, 2010

Renovation update


So now that the work is starting to move forward at a growing pace, we will start to have more updates.

Last Friday the workers removed the benches and stripped the floor in the room to be renovated, and yesterday they started dismantling various pipes.


Today a fellow came in and painted the ceiling (?!), while few others took down the old A/C equipment.


More interestingly, we had to make a choice today about the tiles for the lab. The contractor brought several samples, and we put them in the current lab to see them in the light.


As you can see the choice was between gray colors and beige ones. In each category there were several shades and textures. One of our worries was how do small stains show up on the tile. Basically, because cleaning is done on a weekly basis, lab floors can get quite dirty. To test the performance of the different tiles we sprayed them with water (DDW) and then marched around on all of them in a circle to work some marks onto the surface.


In the end we choose a gray tile that hopefully will give the place a nice color balance.

Sunday, February 14, 2010

New arrival

Today we added another device to our equipment room. Amir from Neotec showed up with a big box.


He installed a Plate Reader - a type of spectrophotometer that can measure multiple points in a multi-well plate. This is useful for many  types of assays. We will use it most often for measuring cell density in each well, and eventually it will be integrated into the robotic platform to be used automatically during the large assays.


As you can see we have space problems, and so the new plate reader was installed on top of a temporary cabinet. Not the most dignified position, but it will do for now.

On another matter, Moran continued her tradition of baking a cake for every submitted manuscript. Today she showed up with a strawberry cheesecake, which was very beautiful and also quite tasty. (It goes without saying that we encourage Moran to submit more manuscripts.)

Weekend Diving

This weekend I spent two days in Eilat (the south tip of Israel) diving. It was a nice break from the day to day work and managed to get some nice photographs.

Wednesday, February 10, 2010

Gel purification


One of our immediate aims these days is to construct a plasmid that will allow us to create "promoter reporters". This involves steps of DNA cloning, which is like building a puzzle from given pieces of DNA.

Roughly speaking cloning is based on three types of steps:

  • PCR amplification - in which we amplify a region of DNA by using primers.
  • Restriction - where we cut a piece of DNA by an enzyme that cut at a specific place and leaves a specific single strand end that can be then used for puzzle building.
  • Ligation - combining pieces from restriction reactions and letting them combine into complete DNA pieces. 
One of the problems we need to face is that after such steps we don't have complete effect. Some by products may be left in the resulting tube. Thus, we want to purify just the right product out.

One technique to do that is to run the product on a gel. This separates the products based on their length - smaller pieces of DNA "run" faster on the gel and will be at lower points.


On the left we see a run of premixed "ladder" of bands. The two bright ones are at 1000bp and 5000bp. The next three columns (or lanes) are three samples. The first one has a nice clean product. The second has a mix of a clean product and a "smear" that looks like the negative control on the third lane.

The picture you see is fluerscence of a DNA-binding dye in response to UV light. When we look at the gel in daylight we only see three dyes at 10, 500, and 5000bp length.


To purify, we cut out the piece of the gel. To do so, we need to examine it on a UV-table. This table emits UV light and then we can see the fluorescent bands by eye.


The problem is how to work so not to get too much of UV radiation on yourself. Moreover, the UV exposure can damage the DNA. Thus, we want to work quickly. Using a scalpel, we cut the bands and put them in tubes for later processing.


MasterClave (continued)

In the last entry on the MasterClave we skipped the plate pouring step. Today I managed to get some pictures (with the help of Avital) and so we can complete the story.

As you remember, we "cook" the media in the MasterClave. Once the agar is ready, can hook in a hose that sips into the hot agar mix. The hose is pre-sterilized and so does not introduce contamination.


The hose is then hooked into a pump that allows us to pump the media through the hose. The pump is calibrated so that every press on a foot pedal pumps a desired amount of agar.


This means that pouring a stack of plates is done rapidly. We do not need to open the plate completely (for comparison recall that in manual pouring we remove the lid) , and moreover the amount of agar in each plate is uniform and delivered at a constant temperature.

Tuesday, February 9, 2010

MasterClave

I mentioned briefly this device when it arrived two weeks ago. Today we used and this gives me a chance to tell you more about this device.

When growing microorganisms (bacteria, yeast, etc.) we usually either use a "wet" environment (media) or a "dry" one, where we grow them on agar basis - a jelly substance that contains nutrients. As I learned today, agar is made from seaweed and was originally used to make gelatinous food in the orient, so it is in an essence, jelly.

To make agar plates, we need to prepare a mixture of water, glucose (sugar), nutrients, and, of course,  agar. Each of the components is weighted to make sure we match the recipe.


This mix is then heated to achieve two goals. First, sterilization to ensure that no other microorganism gets to party on the good stuff. And second to melt the agar. When the liquid is cooled down, the molecules will form a network that will stabilize the jelly.

Since we plan on making many agar plates, we equipped ourselves with the MasterClave. A device to make agar plates a piece of cake.

It consists of a pot-like internal chamber where the agar mixture is put. This chamber has an internal blade for mixing the mixture.
 

Once the mixture is in the pot, we install it in the machine. It is secured into place.


After that we can close the lid, and secure it, much like a pressure cooker.


Now the MasterClave heats the mixture to programmed temperature and pressure, and then lets it cool to a pouring temperature --- one that is not too hot to damage the plates, and not to cold enough for the agar to solidify. At this stage we can also add temperature sensitive ingredients (such as antibiotics) and have them mix into the melted agar.


Connected to the MasterClave is pump that allows us to deliver pre-configured amount of agar in each press on foot pedal. I missed the pouring step today (committee meeting), but the results are a nice stack of plates. These need to cool down for a day, and then can be packed and stored for use.


Today we made only a liter of agar, but the MasterClave can make up to 9 liters, which allows for a much more substantial amount of plates.

On an other note, Naomi visited the lab today. We immediately put her to work and had her load a gel. She did not hesitate and did a marvelous job at it.

Actual work?!? Renovation (slowly) starts

Today was a cause for celebration, as we saw the first steps of actual work that changes the physical layout. An electricity contractor showed up and removed all electricity from the room that will be renovated in the first round.


This now opens the way for the renovation contractor to come in and remove the floors and start the make over.

Friday, February 5, 2010

Heat Blocks and Microscope

The next step in our molecular cloning adventure, is the use of restriction enzymes. These cut at very specific "words" in double stranded DNA. These are quite easy to use, mix DNA (plasmid in this case) with enzyme, incubate at 37C, and then move to 80C for denaturing the enzyme (so it won't cut any thing later).

Only issue is how to heat the tubes. For this we use a heat block. A device that heats a block of metal to a specific temperature.


A 10 minute procedure turned in to an operation of finding the blocks we had delivered few weeks ago. Clearing space for them. Realizing that we don't have sufficient electricity outlets there. Finding a power strip. Fixing the electricity outlet above the bench to accept modern power plugs (dismantling the plastic covers of each and using a drill widening the holes). This took half the morning.


Once we had everything in place, the protocol was very straightforward. Unfortunately, the confirmation gel that Avital run didn't show any product, suggesting something was wrong.

On other fronts, yesterday we had a delivery of a new bunch of boxes that contain our own microscope body (the one we have is a demo). And next week we will have an installation, there by increasing the faction of the microscope that is actually ours.

In the mean time, our next door neighbor, Sebastian, came to use the microscope to do an experiment that they were stuck on. It took about half an hour to set the acquisition. It took a bit more to get the analysis going, but all by all it was surprising the ease by which we managed to get a fairly large measurement going for him.